*A lot of reading here so save the page for later !
This method takes an 8 mm movie film suitably projected on to a small screen for capture by a web cam frame by frame and such that the projector shutter does not interfere with the captured web cam image. The projector is temporarily modified to provide trigger signals to activate the web cam image capture.
The web cam is set for single frame capture and triggered from a contact which is connected in parallel to the computer mouse button switch. Images can be captured at a rate determined by the web cam settings and the computer response time to mouse 'phantom' clicks. Phantom mouse clicks are obtained from the projector using an optical coupler which activates a relay contact to initiate the multiple frame capture. This procedure avoids using a video camera to capture the cine film to video tape which then needs to be imported into the computer and which can cause frame interference due to unsynchronised capture.
Any audio which acompanies the cine film will need to be first transfered to tape or directly to a sound file for later addition in the video editor. Sound sync can be re-established by use of an audio/video editor which has the ability to stretch and contract the sound timebase. This project should not be expected to be a quick transfer method but then again it is not all that complicated so that if you have several old cine films, treat this as suitable project for those dark winter evenings.
Expertise Required for the project:
You will need to open up the computer mouse and make two soldered connections, one to each contact of the mouse switch. This is best done using an old mouse or else decide to replace your mouse when finished digitising if you don't want the added mouse contact sockets showing. For this you need to be able to solder fine wire connections.
The projector will also need to be opened up so that an opto coupler can be fitted which will sense the shutter movement from the projector gears. Also, it would be useful to have the shutter vane removed or temporarily bent out of the way of the light beam, though this is not essential. The projector will need some form of speed control to slow it down to about 6 fps.You can use any other means of creating a signal from the film transport mechanism if you so desire as long as this generates a signal for the relay circuit.
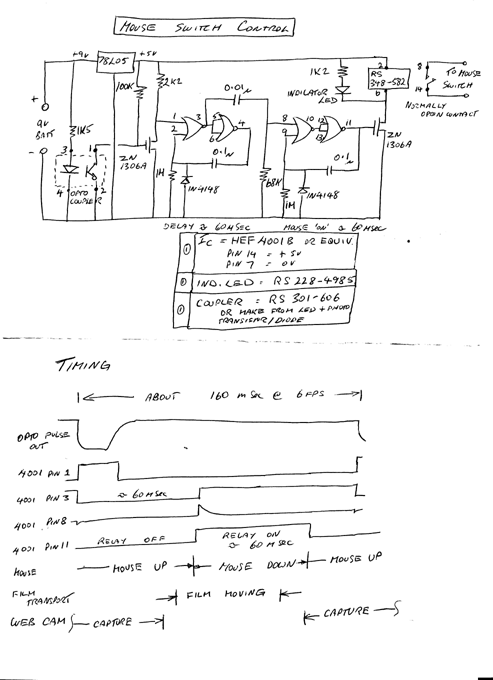
It is necessary to be able to make up a small relay circuit as shown below and it would be useful to be able to understand some simple elecronics in case there is a problem. The relay circuit's sole purpose is to prevent spurious 'phantom' mouse clicks occuring during each frame capture and to provide an automatic single mouse click to capture each frame.
If you feel confident that you can complete the above then you will be able to transfer hours of cine film archives to avi files. Editing and encoding these avi files to mpg's and DVD's for viewing on the TV can save those precious old home movies to a modern format. Information on how to edit & convert files can be found at www.vcdhelp.com.
Of course you could do it the easy way using a video camera and projector but unless you can keep them synchronised, the shutter & frame capture will interfere (which I assume if you are reading this you do not want). My own films have now been transferred, edited and configured for PAL TV mpg/ VCD's for posterity using this method. I hope this system will be of use for anyone with such an interest.
Before embarking on this project you should first evaluate your cine projector and verify that you will be able to add the changes required.
Technical Details:
The first operation is to construct the relay control circuit (pic at the end of this page) since if this cannot be made to work then it would be pointless continuing further. The job of this is to take an opto coupler signal, amplify it, stretch it and generate a fixed pulse to operate a reed relay after each time the film is moved. The reed relay contacts then are connected across the mouse switch via connections made to the mouse switch. Simple enough... but the timing needs to be right.
It is possible to actuate a reed relay directly from a rotating magnet attached to the projector shutter gear but this will have problems because of projector speed variations and possible double or multiple spurious relay actuations if the magnetic field is on the edge. Also you will find the reed relay needs to be on for a minimum time and off for a maximum time which is difficult to control by reed/magnet proximity and, when the projector is stopped after capture operations, this could occur with the contact closed or in the mouse click down mode so that you will have to disconnect the connection to gain control of the computer.
Back to the opto coupler....this takes the signal and feeds it into a MOS FET transistor producing a trigger edge to be used for the reed relay mono stable circuit. The relay needs to be 'on' with the contacts closed for approximatly 60 millisecs before being released. It should be in the 'on' condition while the film is still being moved. Since the computer software responds when the mouse button is released, the relay 'on' time is important to prevent contact bounce from causing spurious mouse 'clicks' and unstable frame capture.
The relay 'off' time, when the frame is captured, can be as short as the system will allow so the projector speed can be increased until frame captures become unstable. If you are capturing at say 6 fps then the total time frame to frame will be 166 msec. This might appear slow but remember each frame has to be captured by the camera and be saved to hard disk by adding to the previously saved data. The LED across the relay will keep you informed of the switching operation and act as a speed indicator by judging its flash rate. If you are feeling ambitious, a frame counter can be added to compare actual frames captured against frames initiated for capture.
The opto coupler signal can be tested by swiping a white card or paint spot across the coupler in a darkened enviroment and check it operates for slow and fast movements. A very slow movement will not allow the correct relay operation because the mono stable trigger edge will not pass through the differentiater C-R. Use this experiment to determine how far the reflecter card has to be to make the circuit operate properly.
When happy with the opto coupler feeding the control reed relay circuit the projector can be adapted for the opto coupler itself. Since the cine film frame moves once for three shutter operations (on 8 mm cine at 16fps) digitising speed can be improved by preventing the shutter from blanking off the image.The web camera will be triggered just after the film has moved through the gate so that the capture can be completed before the next film movement occurs. Moving the shutter vane out of the way allows a much longer time to capture and so the capture rate can be increased by speeding up the projector. The film claw to shutter operation is 3:1 and this is usually obtained by a small gear from the rotating shutter shaft linked to the film claw mechanism.
The opto coupler needs to be mounted so that it will be operated by a white spot of paint applied to the rotating gear. If the gear is white nylon or just plain white, you will need to darken the gear face first before applying the white paint spot to the gear body (not the gear teeth). Remember that residual light within the area where the opto coupler is located will illuminate the photo recepter and stop a signal being generated by the white reflective paint spot. Rotate the motor manually so that the film claw has just finished its film transport move and apply the paint spot so that the opto coupler signal finishes at this point in the cycle, that is when the relay contact opens to release the mouse. As long as the signal for the relay is ended after the film has moved then the capture will not see the moving image. Fix the opto coupler in position with a spot of epoxy or by other means. If you don't want to remove the shutter, then the projector will need to be run slow enough to capture the image between the film movement and the next shutter blanking.
Connections from the opto coupler to the control circuit should be passed through a connector if possible so that the projector can be moved free of the contol circuit. Allow enough cable (twin screened audio cable is adequate) as the projector /computer/control circuit proximity may be separated by several metres.
Sorting the mouse out is pretty much self evident. Obtain a pair of small sockets and fix these to the side of the mouse by creating an access hole. Alternately you can use an in line socket on short insulated wires which can be brought out through the mouse cable aperture. These sockets need to be connected to the left hand mouse button switch or its connections within the mouse itself. Eventually a volt free relay contact will be connected into the sockets which will close & open just as the mouse button switch does. Test the connections by shorting/unshorting the connecters to simulate a mouse click.
The Basic Capture Operation:
Capturing frame data is acheived by running the cine projector slow enough to allow a frame signal from the projector to activate the mouse as if it had been clicked manually so that a web camera will digitise the currently displayed frame image.
The speed of capture is determined by the computer and the web camera resolution and settings. The fastest response time is obtained when the web camera settings are on manual. That is, a fixed exposure setting with the brightness & contast set manually by the capture software adjustments. If left on automatic exposure, the web camera will not adjust fast enough when scenes change. This results in the the first or second frame captured after a scene changes from light to dark being excessively dark and vice versa. The web camera's automatic exposure also changes the original light/dark scenes to a level which is not as originally exposed.
A dedicated defragged file should be assigned to save the captured frames. Ulead video capture software allows for this so that you end up with say 7000 frames as an AVI file. If possible set the computer bios options for fastest operation. In practice, with a relatively slow computer a frame capture rate of 6 fps (166 mSec throughput) or more can be acheived. This might seem slow but 8 mm cine operates normally at 16 fps which ends up a viewable 48 fps due to the shutter operation running at 3 times the frame rate. Save the camera settings for subsequent capture operations.
Set the frame rate options in the capture software to give 16 fps so that the captured AVI file properties show the file as a 16 fps file. This will ensure that when played back, the correct duplication of frames will occur. That is, at 16 fps every second frame is duplicated making 24 fps plus one frame which has an extra duplication. The sequence becomes 1,2,1,2,1,2,1,2,1,2,1,2.1,2,1,2,2 making 25 fps for viewing in the movie editor or the media player. This sequence does not need constructing explicitly as it is automatically taken care of by the playback or editing software. These figures will be different if a different film system is being digitised such as 24 fps.
Create a test file from a loop of film to see what is involved. It goes something like this :
1) Check that the mouse connects and relay control are ready.
2) Run the single frame capture software.
3) Place the mouse pointer over the capture software single frame capture button.
4) Start the projector slowly and watch the mouse pointer 'clicking' the software display button as frames are captured.
5) Adjust the projector speed for optimum capture.
6) When complete shut off the projector & save the file.
A typical 10 minute film has 9600 frames and will take up nearly a gigabyte of space so you need a lot of hard disk capacity. This can be compressed down somewhat by the movie editor but is better kept to a minimum so that the later conversion to an mpg file uses uses more of the original data. The Ulead video capture software frame capture counter cannot handle more than 10,000 frames at which point the counter indicator becomes jumbled although the actual capture is unaffected. My own 20 minute films were sectioned into 3 or 4 segments and then edited together after digitising. Testing the fastest rate of digitising is important not just for time saving but to avoid overheating the projector.
Problem Areas:
The projector speed will be slow and consequently its cooling fan will not be as effective. An 8 minute real time film conversion takes about 20 minutes. Long continuous operation should not be maintained without adequate cooling since the heat generated by the lamp will spread throughout the projector motor and metalwork and could cause overheating damage to the projector. Allow a good projector cooling off period between captures. I had purchased an old but unused 100W lamp for my Eumig projector which worked ok for short capture periods. Later, to save the lamp life, I obtained a quartz 60W car headlamp bulb and linked the connections to a bayonet base from an old car stop lamp bulb. By setting the position of the filaments the same distance from the base this worked as good and much cooler because of the lower wattage and better light efficiency.
When running the projector slowly at start up it is easy to stall the projector. If the lamp has full power then this will fry the film whilst stationary. I used a light dimmer type speed control and set the projector voltage such that the lamp was only just enough to show a dim picture and then adjusted to full power when the projector motor was running properly.
Be careful of old projectors with dirty condenser lens's. I managed to crack one half of the Eumig lens due to extra heat being absorbed by the lens. I purchased a second hand Eumig projector to obtain a new lens but when opened up this also had half of its dual lens also cracked. Fortunately I could make up one complete dual lens replacement which worked fine. A cracked condenser lens de focuses the image too much for digitising as the image is fuzzy.
Don't start the capture operations and expect to complete them all in a week. Consider it as a long term winter project and set up the projector and web cam in a semi permanent position. I projected onto an black edged A4 sheet stuck on the wall with the projector sat on the computer. The web cam needs to be close to the image so to reduce the parallax get it positioned properly and mark it in case you have to move it. It is much better to do a couple of small test files to get the feel of it. Also, I found that the file size when converting to mpg using TMPenc.exe encoder couldn't handle files of greater than 1 gigabyte avi and frequently 'hung' so I had to split these in two sections for later merging. Later versions of TMPenc seem ok.
The MOS fet in the circuit below should be ZVN1306A.